本页面介绍编辑器端配置——这是将基于浏览器的 TinyMCE 编辑器与运行中的 AI 服务连接的最后一步。在部署过程中,此时 数据层、LLM providers和 JWT token endpoint已正常运行。本页面将编辑器与该基础架构连接起来。
前提条件:
AI 服务已运行且浏览器可访问(参见 入门指南)。
存在可签发 HS256 JWT 的 token endpoint(参见 JWT 认证)。
已启用 AI 功能的有效 TinyMCE license key 或 API key。
有关框架通用配置(安装包装器、组件结构),请参阅现有集成指南:
本地部署 AI 集成会将下列选项添加到标准 TinyMCE init 配置中。
Token 流程
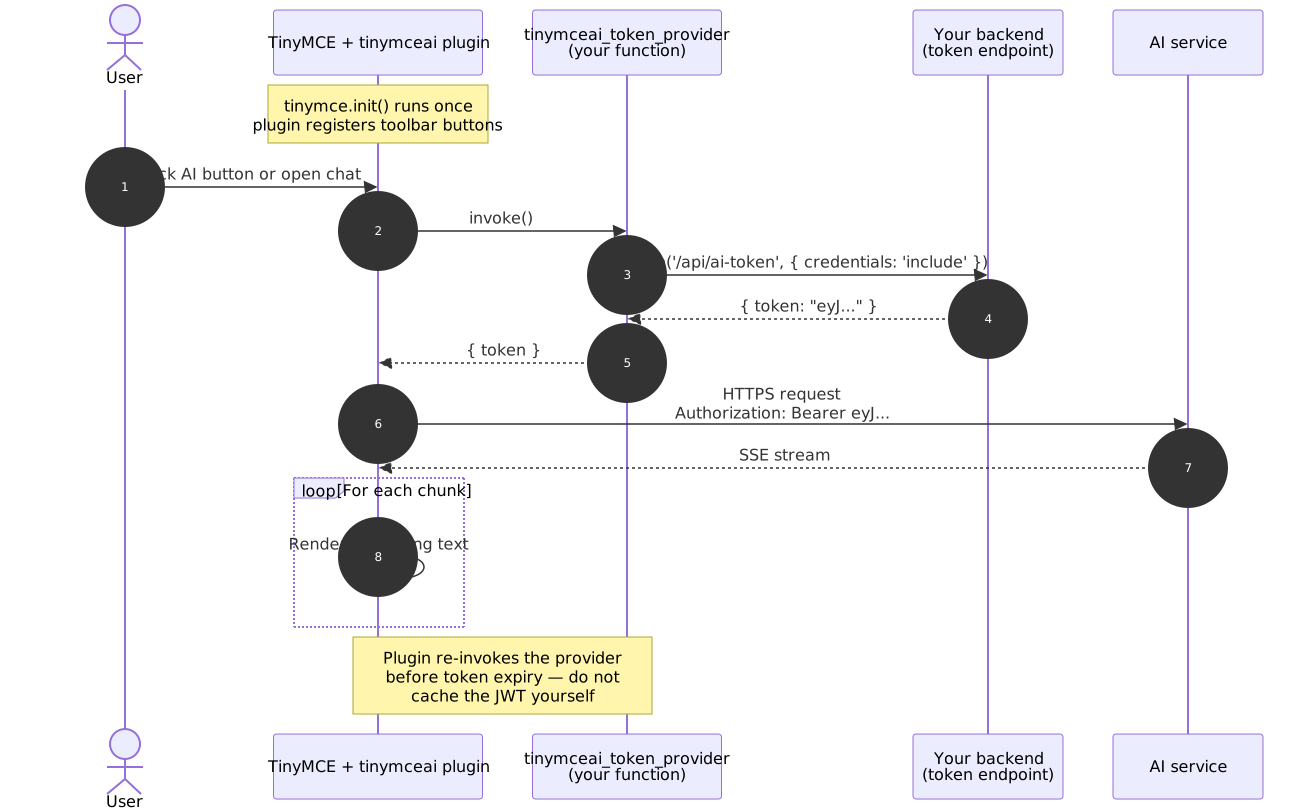
插件在初始化时和缓存 token 过期前会调用 token provider。应用后端通过自身 session 层验证浏览器请求,使用 API Secret 签发 HS256 JWT 并返回。插件随后在每次请求中将 JWT 发送给 AI 服务。
必需的编辑器选项
| 选项 | 说明 |
|---|---|
|
|
| 包含 |
| AI 服务的 base URL,例如 |
| 返回 |
最小示例
以下原生 JavaScript 示例包含所有本地部署专属选项。相同的 init 选项同样适用于 React、Vue、Angular 和 Svelte 包装器组件。
<!DOCTYPE html>
<html>
<head>
  <script src="/path/to/tinymce/tinymce.min.js" referrerpolicy="origin"></script>
</head>
<body>
  <textarea id="editor"><p>Hello world.</p></textarea>
  <script>
    tinymce.init({
      selector: '#editor',
      license_key: 'T8LK:...',
      plugins: 'tinymceai',
      toolbar: 'undo redo | bold italic | tinymceai-chat tinymceai-review tinymceai-quickactions',
      height: 500,
      tinymceai_service_url: 'https://ai.yourcompany.com',
      tinymceai_token_provider: () => {
        return fetch('/api/ai-token', {
          method: 'POST',
          credentials: 'include'
        })
          .then((r) => r.json())
          .then((data) => ({ token: data.token }));
      }
    });
  </script>
</body>
</html>
将 /path/to/tinymce/ 替换为自托管 TinyMCE 资源的位置。有关下载和设置说明,请参见 自托管安装。
tinymceai_token_provider
返回 Promise 的函数,该 Promise 解析为包含 JWT 字符串的 token 属性对象。
{ token: 'eyJhbGciOiJIUzI1NiIs...' }provider 示例tinymceai_token_provider: () => {
return fetch('/api/ai-token', { method: 'POST' })
.then((r) => r.json())
.then((data) => ({ token: data.token }));
}| 行为 | 详情 |
|---|---|
自动刷新 | 插件在初始化时和缓存 token 即将过期(60 秒安全余量)时会再次调用 provider。请勿在 provider 内部缓存 JWT。 |
错误处理 | 如果函数 reject 或 endpoint 返回非 OK 响应,插件会在编辑器界面显示错误。未返回 |
Token 有效期 | Token 应采用短时效(推荐 5–15 分钟)。关于签名密钥、payload 结构以及时效设置指南,请参阅 JWT authentication。 |
框架特定示例
以下示例展示了将 TinyMCE AI 插件连接到本地部署服务所需的最小配置。每个示例都使用框架包装器的 init 属性传递上文所记录的相同选项。
React
import { Editor } from '@tinymce/tinymce-react';

function MyEditor() {
  return (
    <Editor
      licenseKey="T8LK:..."
      init={{
        plugins: 'tinymceai',
        toolbar: 'undo redo | bold italic | tinymceai-chat tinymceai-review tinymceai-quickactions',
        height: 500,
        tinymceai_service_url: 'https://ai.yourcompany.com',
        tinymceai_token_provider: () =>
          fetch('/api/ai-token', { method: 'POST', credentials: 'include' })
            .then((r) => r.json())
            .then((data) => ({ token: data.token }))
      }}
    />
  );
}
Vue.js
<template>
  <Editor
    license-key="T8LK:..."
    :init="editorInit"
  />
</template>

<script setup>
import Editor from '@tinymce/tinymce-vue';

const editorInit = {
  plugins: 'tinymceai',
  toolbar: 'undo redo | bold italic | tinymceai-chat tinymceai-review tinymceai-quickactions',
  height: 500,
  tinymceai_service_url: 'https://ai.yourcompany.com',
  tinymceai_token_provider: () =>
    fetch('/api/ai-token', { method: 'POST', credentials: 'include' })
      .then((r) => r.json())
      .then((data) => ({ token: data.token }))
};
</script>
Angular
<!-- app.component.html -->
<editor
  [licenseKey]="'T8LK:...'"
  [init]="editorInit"
></editor>
// app.component.ts
import { Component } from '@angular/core';

@Component({ selector: 'app-root', templateUrl: './app.component.html' })
export class AppComponent {
  editorInit = {
    plugins: 'tinymceai',
    toolbar: 'undo redo | bold italic | tinymceai-chat tinymceai-review tinymceai-quickactions',
    height: 500,
    tinymceai_service_url: 'https://ai.yourcompany.com',
    tinymceai_token_provider: () =>
      fetch('/api/ai-token', { method: 'POST', credentials: 'include' })
        .then((r: Response) => r.json())
        .then((data: { token: string }) => ({ token: data.token }))
  };
}
关于通用的框架配置(安装包装器、SSR 配置、bundler 设置),请参考本页面顶部链接的框架集成指南。请将 T8LK:… 替换为 Tiny 账户代表提供的 license key。
对 token 请求进行身份验证
tinymceai_token_provider 会从应用后端获取一个 JWT。该后端如何验证来自浏览器的请求取决于应用架构。
会话 Cookie
如果页面和 token 端点位于同一 origin(或同一父域),浏览器将自动发送会话 cookie:
fetch('/api/ai-token', { method: 'POST', credentials: 'include' })对于跨 origin 的 token 端点,后端必须返回 Access-Control-Allow-Origin: <editor-origin>(不能为 *)和 Access-Control-Allow-Credentials: true,并且会话 cookie 必须设置为 SameSite=None; Secure。
Bearer Header
如果应用已持有会话 JWT(在渲染时注入,或来自某个 auth 库),请将其作为 header 转发:
fetch('/api/ai-token', {
  method: 'POST',
  headers: { 'Authorization': `Bearer ${sessionJwt}` }
})
此模式完全避免使用 cookie,并且适用于跨 origin 设置。
对 AI 服务的跨 origin 请求
在生产环境中,编辑器页面与 AI 服务通常运行在不同的 origin(https://app.yourcompany.com 与 https://ai.yourcompany.com)。AI 服务必须返回允许编辑器 origin 的 CORS headers;否则浏览器将阻止所有请求。
配置 ALLOWED_ORIGINS
在 AI 服务容器上将 ALLOWED_ORIGINS 环境变量设置为以逗号分隔的、被允许的编辑器 origins 列表(scheme + host + port):
-e ALLOWED_ORIGINS='https://app.yourcompany.com,https://staging.yourcompany.com'
| 行为 | 说明 |
|---|---|
格式 | 以逗号分隔的 origins。每个条目必须包含 scheme( |
未设置时的默认行为 | 服务将拒绝跨 origin 请求(无 |
通配符 | 允许使用 |
Preflight(OPTIONS) | 服务会在内部处理 |
凭证 | 当请求源与 |
验证 CORS
curl -i -X OPTIONS https://ai.yourcompany.com/v1/conversations \
  -H 'Origin: https://app.yourcompany.com' \
  -H 'Access-Control-Request-Method: POST' \
  -H 'Access-Control-Request-Headers: authorization,content-type,x-editor-version'
响应应包含 Access-Control-Allow-Origin: https://app.yourcompany.com。如果显示 * 或没有 CORS 头,请更新 AI 服务容器上的 ALLOWED_ORIGINS 并重启。
常见的 CORS 错误
| 错误 | 修复方法 |
|---|---|
源末尾有斜杠( | 去掉末尾的斜杠。 |
非标准端口缺少端口号( | 在 |
| 所有跨域请求都会静默失败。添加编辑器的源。 |
反向代理剥离了 | 配置代理将 |
内容安全策略(CSP)
如果应用程序设置了 Content-Security-Policy 头,请在 connect-src 中允许 AI 服务的源:
Content-Security-Policy:
  connect-src 'self' https://ai.yourcompany.com;
  script-src 'self';
如果使用 Tiny CDN 而不是自托管资源,还需将 https://cdn.tiny.cloud 添加到 script-src 中。
常见的集成错误
| 症状 | 可能的原因 | 修复方法 |
|---|---|---|
编辑器加载但未出现 AI 按钮 |
| 将 |
| 令牌端点拒绝 fetch 请求 | 确认 fetch 发送了会话 cookie( |
AI 响应挂起然后超时 | 反向代理正在缓冲服务器发送事件(SSE) | 禁用代理缓冲。参见生产部署。 |
浏览器控制台显示 |
| 更新 |
| 令牌端点返回无效的 JSON 或非 200 状态码 | 验证: |
对于其他问题,请参见故障排除。